Project Overview
When I started working in IT, I had no idea what a homelab was or why anyone would even want one. Now that I have a few years of experience, and maybe a few grays in my beard, I can definitely see the appeal. Being able to work in an enterprise style sandbox to build and/or break things does sound nice. At least in the sense that I don’t immediately get hit with the wave of emails and phone calls that would ensue when something breaks when working in a normal production environment. With this fact in mind, I decided I wanted to start building my own homelab.
Over the past year I have been acquiring different pieces of equipment to start my build. I opted to physically build the homelab instead of creating one using VMs because I felt I would learn more by working on the equipment itself. This project post is meant to serve as the baseline for the equipment I currently have in my homelab, how it was acquired, and why it was acquired. I will keep this project updated if any new pieces are added or old ones are removed.
Goals
- Acquire equipment for server rack
- Design layout for where everything will fit into the rack
- Build homelab
Equipment
Network Rack
| Quantity | Manufacturer | Item |
|---|---|---|
| 1x | Raising Electronics | 27U 4 Post Adjustable Depth Server Rack |
| 1x | iwillink | 1U 24 Port Patch Panel |
| 2x | Startech.com | 1U 4 Post Adjustable Vented Rack Shelf |
| 2x | Vevor | 1U Server Rack Shelf |
| 2x | Tecmojo | 1U 9 Outlet Rack Mounted PDU |
| 4x | Tecmojo | 1U 4 Post Adjustable Rack Mount Rails |
Hardware
| Quantity | Manufacturer | Item | OS | Purpose |
|---|---|---|---|---|
| 1x | Dell | R430 | VMware ESxi | VM Work |
| 1x | HP | DL360 G7 | TrueNAS | Network Storage |
| 1x | Ruckus | R610 | WAP | |
| 1x | Dell | Optiplex 3020 | OPNsense | Firewall |
| 1x | Cisco | 4431 Router | Cisco OS | Networking Practice |
| 1x | Cisco | Catalyst 2960 Switch | Cisco OS | Networking Practice |
| 2x | Cisco | Catalyst 3850 Switch | Cisco OS | Networking Practice |
| 1x | HP | Envy 700 | Ubuntu | Syslog Server |
| 1x | Custom | Custom PC | Ubuntu | Game Servers |
| 1x | Custom | Small Form Factor PC | Ubuntu | Management PC |
Upgrades
| Quantity | Item | Upgrade For | Purpose |
|---|---|---|---|
| 1x | PCIe WiFi Card w/ WiFi 6E Card | Custom PC | Provide Wi-Fi connectivity for Custom PC |
| 1x | Dual PCIe 3.1 2.5GBase-T Network Adapter w/ Intel I225-V | Dell Optiplex 3020 | To provide additional network ports for OPNsense. At least 1 is needed for WAN traffic and at least 1 is needed for LAN traffic |
| 4x | 8 GB DDR3 12800U 1600MHz RAM | HP Envy 700 | Upgrade RAM |
| 1x | DL360 G7 Backplane Kit | HP ProLiant DL360 G7 | Upgrade to allow for all 8 drive ports to be used |
| 7x | 2.5“ Tray DL360 G7 Tray Caddies | HP ProLiant DL360 G7 | Caddies for drives |
| 8x | 2.5“ Tray Dell R430 Caddies | Dell PowerEdge R430 | Caddies for drives |
Implementation
Step 1: Blueprinting
The first thing I did before buying equipment was taking inventory of everything I currently had that could be used in the lab. I already had a Cisco switch and router, a few PCs and laptops, and a HP ProLiant server. From there, I knew I wanted to add at least 1 more server, preferably a 1U, a WAP, and a few other switches if possible.
After getting a rough idea of everything I planned on putting into the rack, I started looking online for a server rack itself. I knew a 42U rack would’ve been a bit extreme for my use case but I also knew I wanted something that had a little more space to work with incase I wanted to add more later. I also knew I wanted something where I could adjust the length since my ProLiant server was much longer than the Cisco switches and router. Luckily, I found the 27U rack that also had adjustable depth. This was exactly what I needed.
Step 2: Ordering Parts
After deciding on the server rack, things became a lot easier to plan. I started looking through Amazon, eBay, and Facebook Marketplace for the parts and equipment I knew I would need. Fortunately enough for me, I was able to make a few of these purchases during one of Amazon’s Prime Days. I found that Amazon was a really good place for the shelves and the PDUs I ended using.
Now, the harder part of this was finding specific pieces of equipment. Specifically the servers and the parts they needed. I knew I wanted to pick up another server, specifically a Dell PowerEdge, so I would have more variety when learning how servers work. eBay quickly became my best friend for this. I was able to pickup a 1U Dell PowerEdge R430 and rack mounted server rails for both the ProLiant and PowerEdge servers. I also picked up a few hard drive caddies, a Ruckus WAP, and the backplane kit for the ProLiant so that I could use all 8 drive bays.
Once I had all these parts and devices ordered, all I had to do was wait for it to arrive so I could start setting everything up.
Step 3: Putting it All Together
Setting up the server rack was a lot like building a Lego set… for adults… working in IT. After creating the plan for where I wanted everything to go and getting all the parts ordered, it just became of matter of putting it all together.
The first and obviously the most important thing was to get the server rack built. This was pretty straight forward, just screwing in a few bolts together and getting everything upright. Once I had the rack standing, I started putting in the shelves. For me, this is where things got tricky. With having an adjustable server rack and adjustable shelves, I had to do my best to get all the shelves to a length where they would fit into the rack. Both sets of shelves from Tecmojo and Startech have different increments for how much you can extend them by, ultimately giving them different lengths that were either just too short or just too long with how I had the rack itself set. After a bit of finagling, I was able to get them in. Next came the server rails which were significantly easier than the shelves.
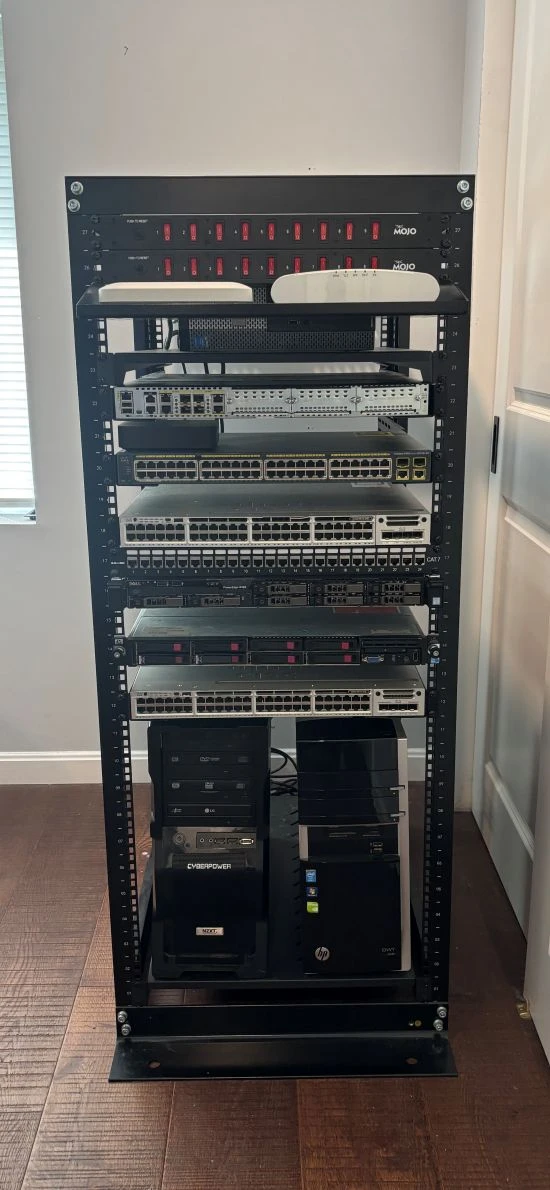
Once all the shelves and server rails were installed, all that was left to do was put all the devices in. I put the 2 PDUs at the very top. I was able to put the Dell PowerEdge in but not the ProLiant due to a small oversite on my part. I realized I was missing the most important part of the server rail… the part that actually fits onto the server itself. Another eBay order later and I was able to get the part in and then the server was installed into the rack. After the servers were installed, the routers and switches were next which fit nicely into the mounted rails. I then put the WAP on one of the outward facing rack shelves, the 2 taller PCs on the full length shelf at the bottom, and the smaller Dell Optiplex on the full length shelf I had towards the top.
And just like that, the barebones of my homelab was made.
Problems and Troubleshooting
Problem #1: Missing Inner Server Rail
Symptoms
When trying to install the ProLiant server rail kit, the server did not fit into the rail kit. It looked like it was missing a piece.
Cause
When looking for the rail kit, I didn’t realize the the kit was made up of HP P/N 364998-001 for the outer rail and P/N 365016-001 for the inner rail. My first purchase was for the outer rail kit which is what fits into the server rack itself.
Solution
I did more research into the parts needed for the rail kit. I found the inner rail part needed, ordered the part, and then was able to fit the server into the rack.
Problem #2: Shelf Fitment
Symptoms
When installing the shelves into the rack, some shelves were too long or too short to fit into the rack.
Cause
The server rack was setup to be a certain depth. The different model shelves all have different lengths they can be adjusted to that don’t fully match each other.
Solution
Adjust shelve depth as best you can to compensate for inconsistencies between rack depth and shelf depth.
What I Learned
Building a homelab was fun and challenging. I learned a lot more into what goes into setting a server rack up and also some of the struggles of working with older equipment. Here are some of the lessons I learned while building the homelab.
Lesson #1: Research, Research, Research
There is a lot of research that goes into setting up a homelab and rightfully so. For me, I had a rough idea of what I wanted to have in the homelab before I even started looking at equipment. This helped a lot because it help me limit what I needed to find. The other thing I realized though, is that you are not just researching equipment for equipment sake. I spent a good amount of time trying to make sure everything I purchased would fit inside the server rack, made sure the servers could support the operating systems I planned on using, and made sure there was enough guides online already so that I wouldn’t be stranded once I started other projects. However, I can say now that it has been worth it to see it all come together.
Lesson #2: Server Rack Layout Planning
I took a little bit of time to decide how I wanted the everything to be laid out in the server rack. I looked into some best practices, recommendations, and also other people’s rack’s online. One of the things I learned is that air flow is a very important consideration in server rack design. You want to make sure there is enough room for hot air to flow freely out and not get caught in areas that could cause servers to start overheating. When designing my rack, I tried to leave come gaps between my servers and the router to allow for this. I also saw a few recommendations to leave heavier items towards the bottom. I took this, and decided to leave my two tower PCs on the bottom shelf and keep my servers a few rack units above them. I ended up designing my rack in a way where I could divide it into three sections that also incorporated everything I learned.
Here is the break down;
- Top - Router, Firewall, Management PC
- Middle - Servers
- Bottom - Tower PCs
By dividing the rack into 3 sections, I could utilize the 3 switches I have to segment each section into its own network. I also did it this way to try and keep the cabling between devices clean. Overall, I now know there is more to consider when planning the network rack layout than only putting devices in just because you can.
Future Planning
- CABLE MANAGEMENT
- Networking practice labs
- Upgrade RAM in servers… when RAM becomes cheaper…